


Introduction to the SPA504G phones
Please note that as from February 11th 2019, Cisco annouces the end-of-sale and end-of-life dates of these phones. For more details, please read Cisco's announcement.
For the new phones UBIK has to offer, see the 6800 guide or the the 8800 guide.
The following is a short guide to introduce you to the phones provided by UBIK (CISCO SPA 5XX series). If you are using phones from another brand (UBIK is compatible with most SIP phones), see the use manual provided by the manufacturer.
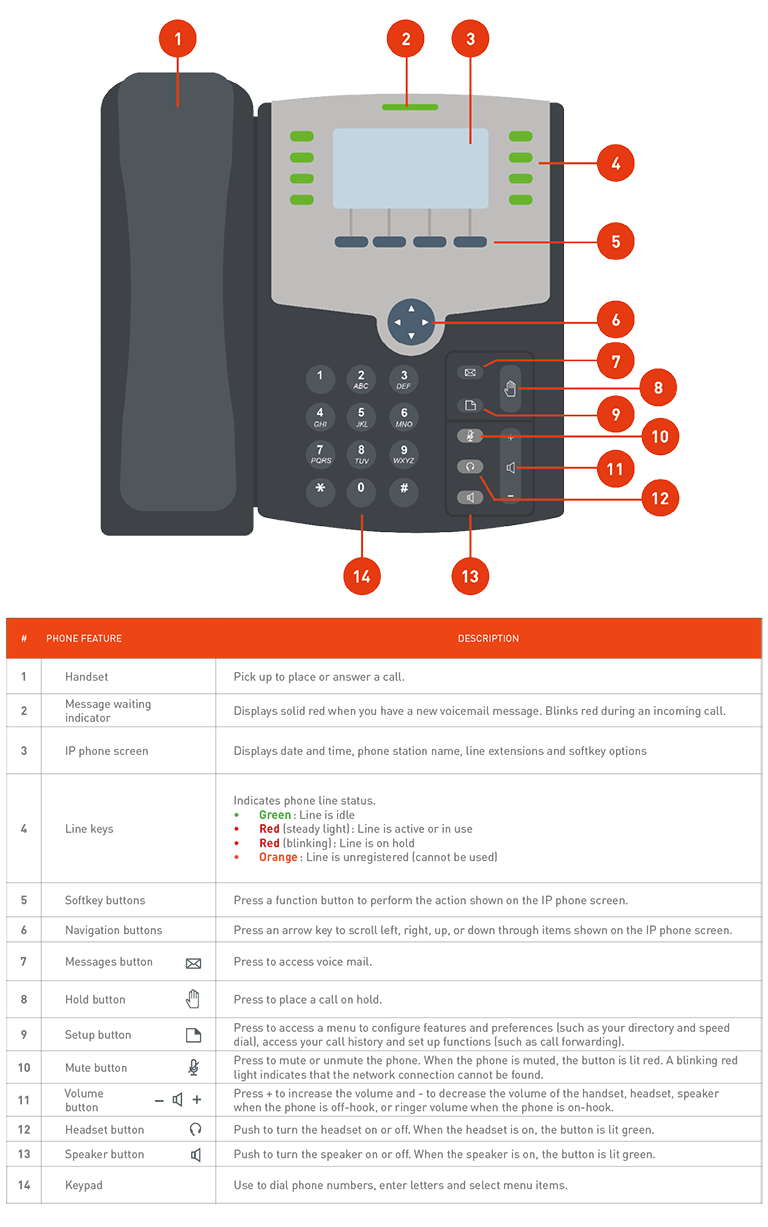
Introduction to phone lines and buttons
Phone maintenance
IP phones are electronic devices that should not be exposed to excessive heat, sunlight, cold, or water. To clean your phone, wipe with a damp paper towel. Do not spray or pour cleaning fluid directly on the phone.
Installing your phone
Before you get started
Before installing and connecting your phone, contact your system administrator to confirm that the phone can be installed on your network, read the safety notices and make sure you have all the phone parts and documentation.
CAUTION
The RJ-11 port marked AUX is reserved for connection with the Cisco SPA 500S, which works with IP phones. It is not for use as a telephone line port.
Do not insert a telephone line cord into the auxiliary (AUX) port.
Phone connections
Phone connections are shown below.
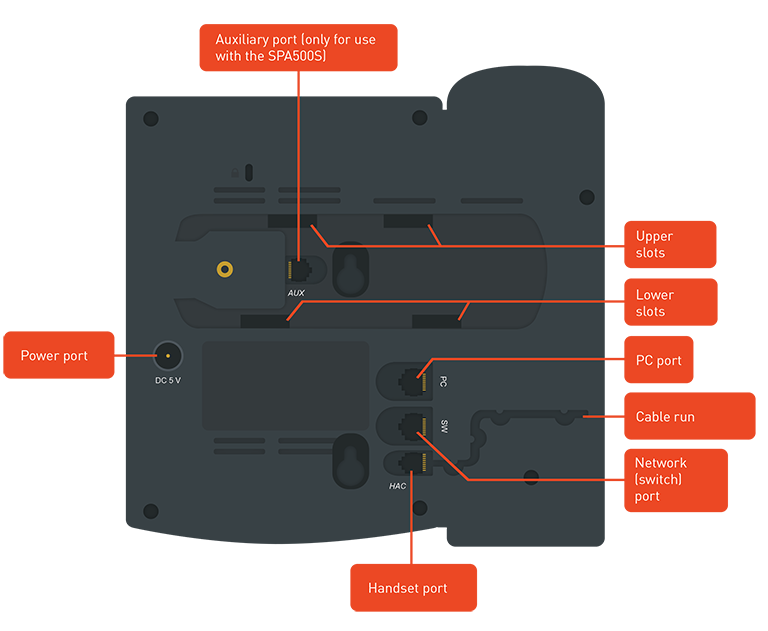
Phone connections
Connecting the handset
Procedure
1. Turn the phone body over to expose the ports on the back of the device. CAUTION: Do not insert a telephone line cord into the auxiliary (AUX) port.
2. Insert the long end of the phone cord into the handset port on the phone body (marked with a phone symbol).
3. Route the telephone cord through the cord run.
4. Insert the other end of the phone cord into the port at the bottom of the handset (not shown).
Installing the desk stand
NOTE: Do not attach the desk stand if you intend to mount the phone to the wall. If you would like to use a Cisco SPA 500S attendant console, attach the console before attaching the desk stand.
Procedure
1. Connect the phone stand by lining up the tabs on the stand with the slots on the phone body.
2. Slide the bottom tabs into the lower slots on the phone body and lightly press down on the stand. It should easily slide into the upper stand slots. Do not force it.
Connecting the power
If you are using an external power source, insert one end of the power cord into a wall outlet and the other end of the cord in the phone’s power port.
Connecting your phone to the network
Procedure
1. Insert one end of the Ethernet cable into the network port on the RJ-45 phone port (marked “SW”)
2. Insert the other end of the Ethernet cable into the appropriate device on the network, such as a network switch or wall outlet.
Connecting a PC to your phone (optional)
Procedure
1. To provide network access to a PC, connect one end of an Ethernet cable (not provided) to the PC port on the back of the phone body.
2. Connect the other end of the Ethernet cable to the RJ-45 port on your PC.
Connecting wired and wireless headsets (optional)
Each brand and type of headset might require different steps for connection. Consult the documentation for your particular headset for more information. In general, to connect a headset:
- Wireless headsets—Connect the headset telephone cord into the telephone port on the back of the IP Phone.
- Wired headsets—Connect the 2.5mm connector from the headset into the headset port on the right side of the IP phone:
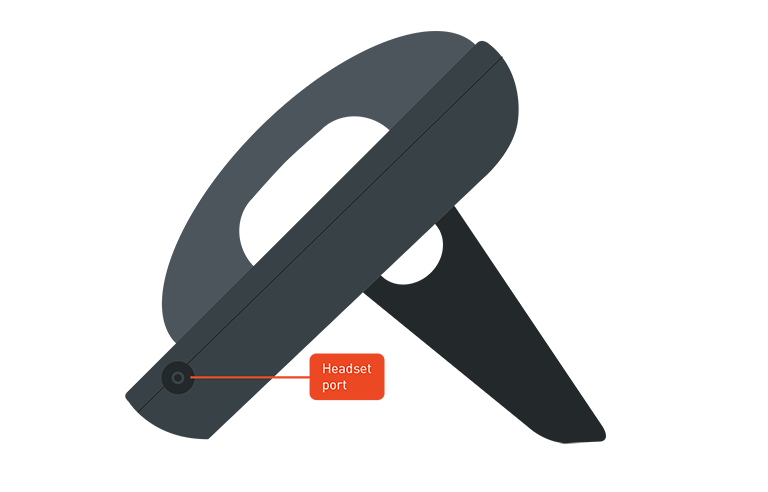
Wired headset connection
Verifying phone startup
After receiving power and network connectivity, the phone executes a boot-up sequence. During this sequence, phones with screens display the Cisco logo and then the message “Initializing Network.” All of the lights on the phone flash.
After your phone is successfully connected to the network and receives a basic configuration, your phone line keys should glow green (on models with phone line keys).
On models with screens, the phone displays the standard menu for the phone. The date, name and number of the phone display on the top line of the IP phone screen. At the bottom of the IP phone screen, softkeys are displayed over their associated soft buttons.


