
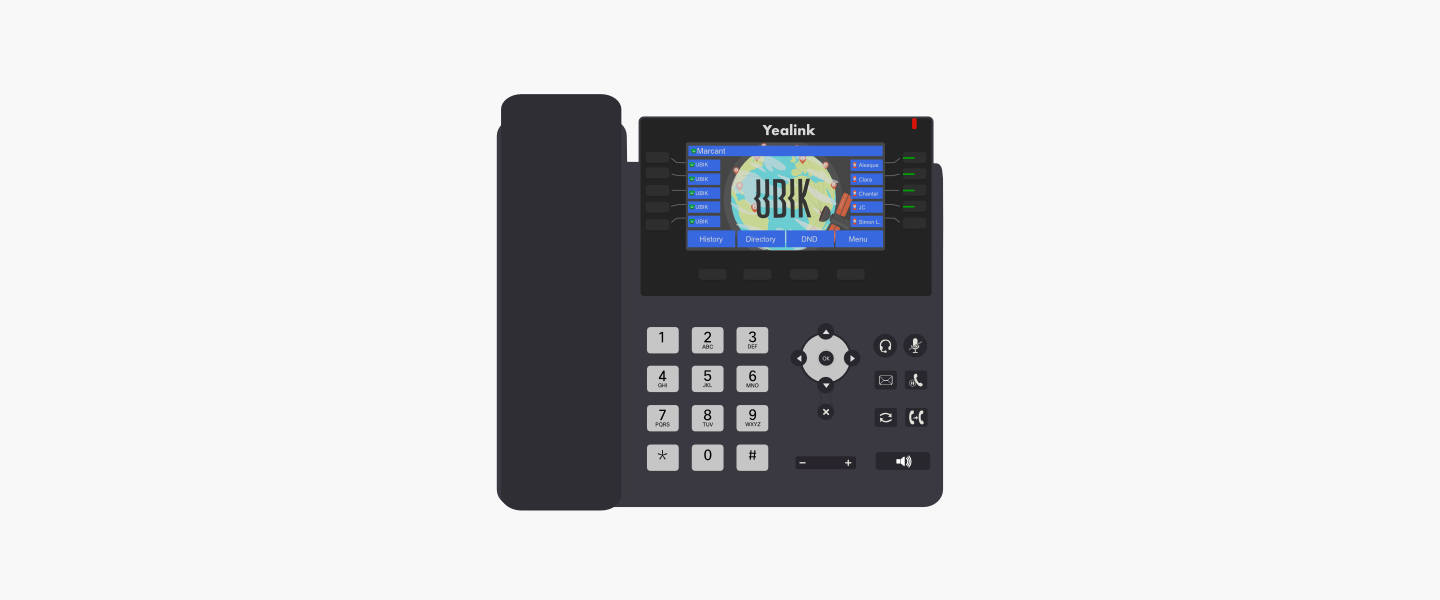

Basic functions of the Yealink T46U phones
The following guide introduces the basic features of T46U telephones.
Changing the display name
Before following the steps below, make sure your phone is connected to the same network as your computer. To select the options, click on the Select button at the bottom of the phone screen.
Important: You cannot apply changes while you are using the phone for a call.
Steps :
- Press the Menu button.
- Select Status.
- Your phone’s IP address will be on the first line (e.g., 192.168.X.X ou 10.1.X.X). Write it down.
- Open your internet browser (Chrome, Firefox, Safari, etc.) and type your phone’s IP address in the search bar. This should bring up a Yealink configuration page. (If you get a message "Your connection is not private" message, click on Advanced Settings and click on Continue to IP Address (dangerous))
- On the configuration page, log in with your login and password;
- Go to the Account tab on the left of the screen;
- Go to the Register sub tab;
- Edit the label option to Change the name of the device;
- To apply the changes, click on the Confirm button at the bottom of the page.
- The phone will apply the change and now display the modified name.
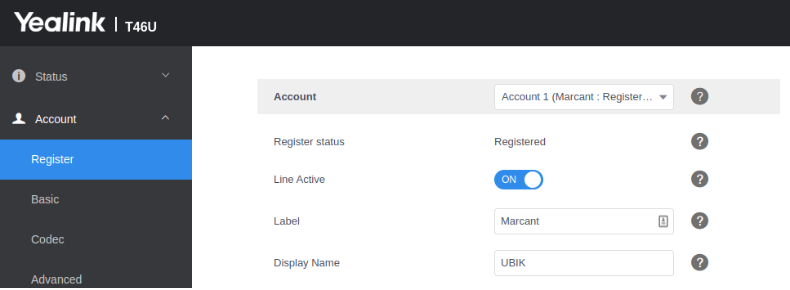
Name option
Using phone equipment and accessories
Using the speakerphone
To use the speakerphone, press Speaker (the handset can be either on or off hook).
Using a headset with your IP phone

Phone buttons (Speaker, Headset)
To use a wired headset, press Headset on your phone and dial the number to place a call, or press Headset to answer a ringing call.
To use a wireless headset, lift the handset off hook before speaking or listening through the headset.
Switching between the handset, headset, and speakerphone during a call
The headset, handset and speaker phone can be used during a call, but only one of these devices can be used at a time.
The handset can be on hook when using the Speaker or Headset function. If switching from the handset to the speakerphone, make sure the speakerphone light is illuminated before placing the handset back on the hook. If you are switching from the handset to a wireless headset, do not replace the handset or you will disconnect the call.
Adjusting volume and using Mute

Volume button
Adjusting call volume
To adjust the volume of the handset or speaker, lift the handset or press the Speaker button. Press + on the Volume button to increase the volume, or press – to decrease the volume.
Adjusting the ringer volume
To adjust the ringer volume, hang up the handset and make sure the speaker button is off. Press + on the Volume button to increase the volume, or press - to decrease the volume.
Using Mute
To mute the handset, speaker and headset microphones, press Mute. The button lights red. Press Mute again to unmute.
If no audio device is on, pressing Mute has no effect. When switching from the speaker phone to the handset, the phone is unmuted automatically.
Answering or placing a call
To answer or place a call, do one of the following:
- Pick up the handset.
- Press Speaker.
- Press Headset.
- Press a green line button (to place a call) or blinking red line button (to answer a call).
If you are on a call and another call comes in, press Answer to place the current call on hold and answer the incoming call.
To return to the first call, press the Resume button.
Putting a call on hold
To put an active call on hold, press the Hold button at the bottom of the screen or the button dedicated to that  . Music plays for the caller on hold to indicate that the call is on hold.
Resuming a call
To resume the call that has been put on hold, press the Resume button or the Hold button.
Ending a call
To end a call:
- If you are using the handset, hang up.
- If you are using the speakerphone, press Speaker.
- If you are using a headset, press Headset (wired) or press End Call button.
- Press the End call button
Transferring a call
You can perform two types of transfers:
- Attended : Call the person to whom you are transferring the call and announce the transfer
- Blind : Transfer the call without speaking to the other party to whom you are transferring the call
Attended transfer
- During an active call, press the Transfer button.
- Enter the number to which you want to transfer the call, then press Call.
- Press Transfer to complete the operation.
Transfer direct
- During an active call, press the Transfer softkey.
- Enter the number to which you want to transfer the call and press Transfer. The call is transferred with no further action required on your part.
Placing a three-way conference call
You can start conference calls by:
- Pressing the Conference button during an active call. The first call is placed on hold, a second line is opened, and you hear a dial tone.
- Dial the second telephone number.
- Press the Conference button again. All three parties are connected in the conference call.
NOTE : When you hang up, the other two parties are disconnected.
Redialling a number
To redial a phone number:
- Press the History softkey and select the desired number from the redial list
- Lift the handset or press Call to dial the selected number.
Viewing and returning missed calls
Your IP phone’s screen notifies you if a call came in and was unanswered.

Missed calls
To view and return a missed call:
- If the IP phone screen shows a missed call, press the Recents softkey to display a list of missed calls, select a call, and press Call.
- If the screen does not show a missed call, you can call back a number from the list in the Recents option or with the Placed Calls button
 .
.
Forwarding calls
- Using the Return function key
- Enter the number to which you would like to forward your calls—for example, another extension or an outside line.
- Press Save at the bottom of the screen.
To activate call forwarding, press the forwarding softkey and click again to reactivate it. A message will be displayed at the top of the screen to indicate whether or not call forwarding is activated.
To change the call forwarding:
- Press the Menu button.
- Press the Features button.
- Press the Forward Call and the call forwarding can be changed.
Setting up Do Not Disturb
Use the Do Not Disturb feature to prevent incoming calls from ringing your phone. If you have voicemail configured, incoming callers can be immediately routed to voicemail. If voicemail is not configured, callers will hear a busy signal or a message stating that the line is busy.
- To Activate Do Not Disturb mode, press the DND softkey. The IP phone screen indicates that Do Not Disturb is turned on for your phone.
- To Disable Do Not Disturb mode, press the DND softkey again.
Parking a call
You can park a call on a designated line so that another person in your company can pick up the call. The call is active until it is unparked or the caller hangs up.
To park a call
- While on an active call, initiate an attended transfer.
- Press the Park softkey or dial *68
- Listen for the virtual operator to announce the parking number. It will be a number from 1 to 30.
- Press the Transfer softkey to complete the operation.
NOTE : A call parked for more than 90 seconds will be automatically transferred back to the phone that parked it.
Resuming a parked call
You or another user will then be able to resume the parked call from any telephone in your organization. To do so:
- Pick up the handset.
- Enter *x, where “x” corresponds to the parking number. For example, dial *1 to pick up the parked call in the first parking position.
Accessing voicemail
To access voicemail, press the Messages button on your phone.
See article Using UBIK voicemail for more details.
button on your phone.
See article Using UBIK voicemail for more details.


